Python: Automating Your Life - Part 1 - PyAutoGui
12 November 2022, Carlos Pena
The idea of this blog is a simple copy and paste of the main functions of this PyAutoGui lib, an application that will be shown in a future ‘Part X’.
PyAutoGui
$ pip install pyautogui
$ sudo apt install scrot python3-tk
Mouse
import pyautogui
pyautogui.size() # size of screen
pyautogui.position() # Mouse position (0, 0) at top left

# Move
pyautogui.moveTo(x, y) # moves to abs position
pyautogui.move(dx, dy) # moves to a rel position

# Clicks
pyautogui.click(x=x, y=y, clicks=1, interval=0, button='primary',duration=0.0)
pyautogui.doubleClick()
pyautogui.drag(dx, dy, duration=dt)
pyautogui.mouseDown(); pyautogui.mouseUp()
pyautogui.scroll(dy)
Keyboard
keys = pyautogui.KEYBOARD_KEYS # list of available keys ['a', ..., '1', ..., 'shift', ...]
pyautogui.write(text, interval=dt)
pyautogui.keyDown('shift')
pyautogui.keyUp('shift')
pyautogui.press('left', presses=1, interval=dt)
pyautogui.hotkey('ctrl', 'alt', 'del')
# pressed right-left, released left-right
Screen
src = pyautogui.screenshot(imageFilename="src.jpg", region=(x0, y0, x1, x2))
type(src) # PIL.Image.Image
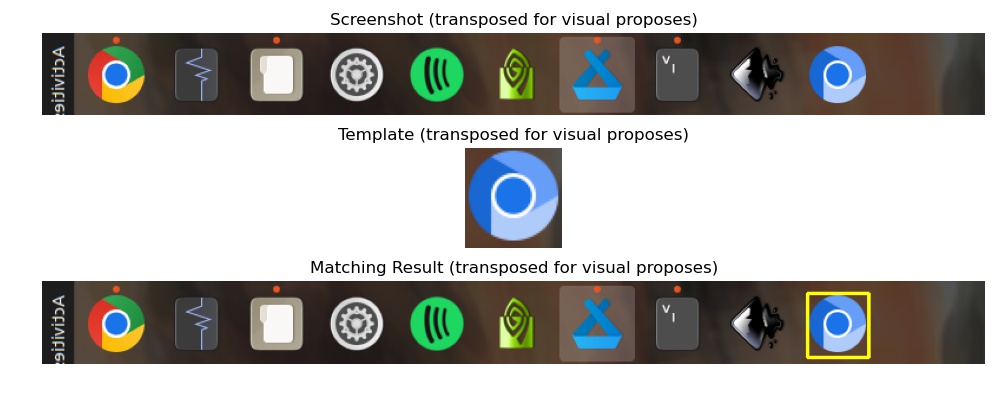
Example
Open an APP with pyautogui, given a template icon.
import cv2
import pyautogui
import numpy as np
from matplotlib import pyplot as plt

src = pyautogui.screenshot(region=(0, 0, 70, 800))
src = np.array(src)

template = cv2.imread("sample_icon.png")
template = template[..., ::-1]  # from BGR to RGB
h, w = template.shape[:2]

# We use the matchTemplate function from the OpenCV library with
# the TM_CCOEFF method as an example. Note that this method is
# not robust to diverse types of transformations (e.g., resize).
result = cv2.matchTemplate(src, template, method=cv2.TM_CCOEFF)

# Using the minMaxLoc to find the coordinates with the maximum correlation
*_, top_left = cv2.minMaxLoc(result)

# Get the top_left, bottom_right points (for visual plot only)
bottom_right = (top_left[0] + w, top_left[1] + h)
draw = cv2.rectangle(src.copy(), top_left, bottom_right, (255, 255, 0), 2)

icon_position = (top_left[0] + w/2, top_left[1] + h/2)
pyautogui.moveTo(icon_position)
pyautogui.click()